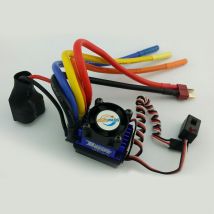
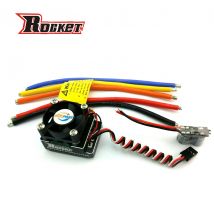
ROCKET 150A ESC for 1/8 RC Car
Description:
Brand Name: ROCKET
Item Name: ROCKET 150A Brushless ESC
Current: 150A
Dimension: 55 x 48 x 37mm
Usage: intending for 1/8th OR 1/10 buggies,truggies and monster trucks
Battery: up to 2s-6S Li battery, NiMh:5S~18S
BEC: 8.4V/3A
Package included:
1x ESC
Surpass ROCKET Series Sensored/Sensorless Brushless ESC for 1:8 scale Car or Truck

Thank you for purchasing the Surpass Brushless Electronic Speed Controller (ESC). The Surpass 1:8 Scale Rocket Series ESC is specifically designed for operating 4 Pole Sensored/Sensorless brushless motors. Surpass Model have no control over the correct use, installation, application or maintenance of these products, thus no liability shall be assumed nor accepted for any damages, losses of costs resulting from the use of this item. Any claims arising from the operating, failure or malfunction etc. will be denied. We assume no liability for personal injury, property damage or consequential damages resulting from our product or our workmanship. As far as is legally permitted, the obligation for compensation is limited to the invoice amount of product in question.
Features:
l Enhanced throttle response, excellent acceleration, linearity and driveability
l Using advanced PC interface to set up or update the firmware
l Using both of LED and LCD program card to make adjustments.
l Adjustable BEC output 6.0V/8.4V
l Multiple protection features: Low voltage cut-off protection, over-heat protection and throttle signal loss protection
l Compatible with NOVAK, LRP , ORION brushless motor
BEAST Series 1:8 ESC Specifications:
|
Model |
1:8 Beast-ZTWSS120A |
1:8 Beast-ZTWSS150A |
|
PN#Model |
4212030 |
4215030 |
|
Cont.Current |
120A |
150A |
|
Burst Current |
760A |
1080A |
|
Resistance |
0.0003ohm |
0.0002ohm |
|
Suitable Car |
1:8 on-road and off-road cars/trucks for general race or RTR application |
1:5&1:8 on-road and off-road cars/trucks for competitive race |
|
Motor Type |
4 Pole Sensorless and Sensored Brushless Motor |
|
|
Suitable Brushless Motor |
4P 3674 3.5D 2150KV |
4P 4074 2Y 2150KV |
|
Battery cell |
2-6S Lipo/5-18S NiMH/NiCd |
|
|
BEC Output |
6.0V,8.4V adjustable/3A |
|
|
Dimension(without fan) |
55*48*37mm |
55*48*37mm |
|
Weight(g) |
142g |
159g |
|
Weight(g) |
142g |
159g |
Block Diagram :
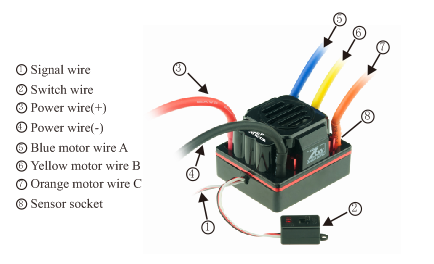
Note: Please refere to the illustration and connect the wire accordingly, wrong connection may get your ESC fried.
Sensored Mode
When using a Sensored Brushless motor, the Blue motor wire A, Yellow motor wire B and Orange motor wire C of the ESC must be connected with the Sensored motor wire A,B,C respectively. It is necessary to connect the Sensor wire to the “Sensor” socket on the ESC. Don’t change the wires sequence optionally.
Sensorless Mode
When using a Sensorless Brushless motor, the Blue motor wire A , Yellow motor wire B and Orange motor wire C of the ESC can be connected with the motor wires freely. If the motor runs in the opposite direction, please swap any two wire connections.
Connecting to the Receiver
Black wire RX-
Red wire RX+6.0V
White wire RX-Signal
LED Indication
When the Power wires on ESC are connected with the battery pack, the ESC can automatically identify the motor type (Sensored/Sensorless) via LED lights
*If the ESC works in Sensored Mode, remove the Sensor wire and the ESC will automatically change to Sensorless Mode.
|
Item |
LED |
LED Status |
|
Low voltage |
Red LED |
Blinking |
|
Over-heat of the ESC and motor (95℃) |
Blue LED |
Blinking |
|
Sensored Mode |
Red and Blue LED |
ON |
|
Sensorless Mode |
Blue LED |
ON |
ThrottleRange Calibration
1. Turn on the transmitter, then connect ESC with the battery packs and set the direction of the throttle channel to REV; set the EPA/ATV value of the throttle channel to 100%.
2. Press and hold the “Set” button and switch on the ESC, release the button when the Blue LED turn solid. Pull the throttle trigger to full position, Red LED light will flashes and motor beeps once. when system confirms the position.
3. Push the throttle trigger to full Brake position, Blue LED light will flashes and motor beeps twice when system confirms the position.
4. Now trigger goes back to neutral position, both of the Red LED and Blue LED blink and motor beeps three times when system confirms the position.
5. Turn off the ESC power switch to save the settings.
6. Turn the ESC back on. You are ready to use the ESC now.
Programmable Item and Default Settings
|
programmable Items |
Programmable Value |
||||||||
|
1 |
2 |
3 |
4 |
5 |
6 |
7 |
8 |
9 |
|
|
Cut-off Voltage |
2.6V/cell |
2.8V/cell |
3.0V/cell |
3.2V/cell |
3.4V/cell |
No cut-off |
|
|
|
|
Running Mode |
Forward w/o Reverse |
Forward with pause then Reverse |
Forward/ Reverse |
|
|
|
|
|
|
|
Motor timing |
Very Low |
Low |
Normal |
High |
Very High |
|
|
|
|
|
Initial Acceleration |
Low |
Medium |
High |
Very High |
|
|
|
|
|
|
Throttle Percent Reverse |
20% |
30% |
40% |
50% |
60% |
70% |
80% |
90% |
100% |
|
Throttle Limit |
0% |
20% |
30% |
40% |
50% |
60% |
70% |
80% |
90% |
|
Percentage Braking |
10% |
20% |
30% |
40% |
50% |
60% |
70% |
80% |
100% |
|
Percentage Drag Brake |
0% |
4% |
8% |
12% |
15% |
20% |
25% |
30% |
|
|
Motor Rotation |
Normal |
Reverse |
|
|
|
|
|
|
|
|
NeutralRange |
2% |
3% |
4% |
5% |
6% |
10% |
|
|
|
|
BEC Output |
6.0V |
8.4V |
|
|
|
|
|
|
|
Noted: Items above Colored are default settings
Cutoff Voltage
l Automatically detect the number of the cells
According to the type of your batteries , set up the type of the batteries and Low Voltage Cutoff Threshold via PC software or program card. The ESC can detect the Voltage of the battery anytime and will lower the output power once the Voltage of the battery is lower than the preset Low Voltage Cutoff Threshold.
l When using NiMH or NiCd batteries you do not need to set a cutoff voltage to protect the batteries. If you are using more than 6-cell NiMH or NiCd batteries, you must adjust the cutoff voltage, for example if you are using an 8-cell pack of NiMH batteries you would use a cutoff of 5.6V volts (8 x 0.7V = 5.6V). When the voltage of the batteries packs is within 8.4~12.6V, the ESC will automatically identify 3S LiPos. When the voltage of the batteries packs is less than 8.4V, the ESC will automatically identify 2S LiPos. When the voltage of the batteries packs is within 8.4~16.8V, the ESC will automatically identify 2~4S LiPos. When the voltage of the batteries packs is within 21~25.2V, the ESC will automatically identify 5-6S LiPos.
l Customized Voltage Cutoff (for NiMH or NiCd Batteries) you can select a starting cutoff voltage of 4, 5, 6, 9 or 12 volts. Then using the up/down to the right of the voltage you can increase the voltage stepping up 0.1V between the selectable settings.
* When using any Lithium batteries, they must not be discharged to less than 3.0V per cell.
Running Mode
· Forward w/o Reverse
This is a Race setting - Reverse is disabled.
You will find in racing, most tracks will not allow racing with reverse enabled.
- Forward with pause then Reverse: (DEFAULT)
General bashing around (FUN) or racing if reverse is allowed for the event. The Electronic Speed Controller requires 2 seconds of continuous neutral from the transmitter prior to allowing reverse to operate.
Note: There is automatic protection within the Surpass ESC. Only after you have stopped and returned the trigger to neutral will reverse become available. If while traveling in reverse, pull the trigger to go forward. This is to help prevent serious damage to the drive train.
- Forward / Reverse
If the option is activated, the RC car could go forward and backward, but couldn`t brake.
ESC – reverse operation
Should you get into a situation that requires reverse, after you have applied any brakes you may have needed, return the throttle trigger to the neutral position. Wait a moment or two and then push the trigger forward for reverse.
Motor Timing
This option affects the power band and efficiency (run time) of an electric motor. The default is “Normal” and is a good starting point to deliver power and provide good run time.
- Very Low Providesmaximum efficiency with less power. Higher timing produces significantly more power but at the expense of efficiency (less run time) and typically the motor will generate more heat. Each brushless motor will respond to timing differently. Good for running around on paved, or harder surfaces, and racing with high KV rated or low-turn motors
- Low Provides power for running through soft surfaces, having fun and longer run time.
- Normal (Default) Good mix of power and efficiency using any motor
- High More power than efficiency so run time will reduce, and you should be monitoring motor heat. The higher KV or lower turn motors will generate heat quickly using this setting. A safe high temperature range is 165F to 180F (74° - 82° Celsius), going higher may damage your motor.
- Very high This is maximum power and must be used with caution.
Note : Any motor has the potential to over-heat in this setting. Frequently check the motor temperature and make sure you’re not operating higher than 165° and 180° Fahrenheit (74° - 82° Celsius), which may damage your motor, or damage your Electronic Speed Controller (ESC).
Initial Acceleration
Use this to limit the initial power that is sent to the motor when starting from a complete stop.
Using the low option, the vehicle will launch very slowly and provide the longest run times. When using the HIGH choice, you will have wheel-spinning acceleration at the cost of run time. This is also very tough on the batteries as the amperage draw can be very high. If your vehicle cuts out, hesitates or loses radio control, you should consider setting this at a lower value.
- Low Using this option will provide longer run times and is easiest on the batteries. It is a good choice for beginners.
- Medium Medium requires more from your batteries, and is good for low traction surfaces.
- High This option will provide full acceleration and requires stout batteries to supply the load required in this setting.
- Very high This option will provide full acceleration and requires stout batteries to supply the load required in this setting.
Throttle Percent Reverse
Use this to limit the power available using reverse throttle. The lower the percent or level the less speed will be available in reverse.
20%, 30%,40%,50%,60%( Default),70%,80%,90%,100%
Throttle Limit
Use this to limit the power available using forward throttle.
The lower the percent the less forward throttle speed will be available.
0%(Default), 20%,30%,40%,50%,60%,70%,80%,90%
Percentage Braking
Gives you the ability to have full control over the amount of brake your vehicle will have.
10%,20%,30%,40%,50%(Default),60%,70%,80%,100%
Percentage Drag Brake
0%( Default) 4%,8%,12%,15%,20%,25%,30%
The drag brake function provides the driver a set percentage of brake when you have the transmitter resting in neutral. This will create the “feel” of a brushed motor.
Drag brake are used in racing to slow a vehicle as you let off approaching a corner versus the driver having to push the brake at every corner.
Try working with this to get a sense of how you might use this for your track.
If you are running on a high traction track with tight corners, a stronger setting should work best.
If you are running in an open area, you will find a smaller percentage will result in better control.
If you are running in dusty or slippery surfaces, you will more than likely want to use the lowest option.
Motor Rotation
Normal (default), Reverse
Neutral Range
This setting adjusts the amount of “Deadband” off neutral on the throttle trigger. This is in Milli-Seconds (MS) and is the amount of neutral when you pull the trigger.
The smaller the value the less “Deadband” or movement is required off-center for the ESC to begin throttle functions.
Using a higher value for this setting will provide a wider Deadband.
- 2%
- 3%
- 4% (Default)
- 5%
- 6%
- 10%
BEC Output
6.0V (Default) , 8.4V
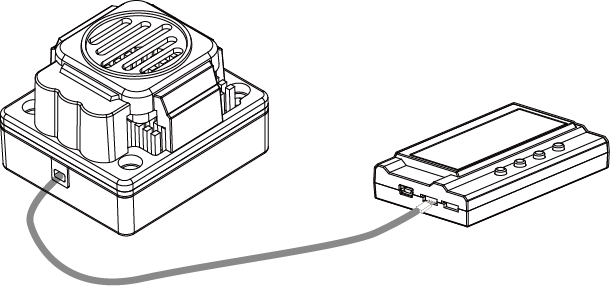
Surpass LCD Program Card
Surpass LCD Program card can be used to set up all brushless ESC for RC aircraft and car produced bySurpass except Turbo SS120A. Users can choose their desired parameter at any time.
LCD program Card Can be used as follows:
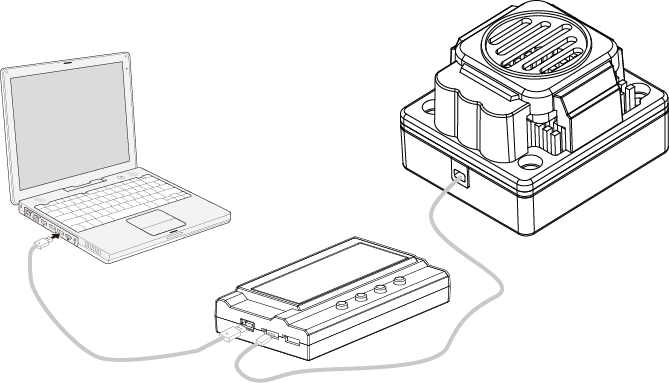
a) Working as an individual device to set the parameters of ESC.
b) Working as an USB adapter to link the ESC with PC, to update the firmware of ESC and set the parameters of ESC on PC.
Specification:
Dimension: 91mm*54mm*18mm (L*W*H)
Weight: 68g
Power supply: DC 5.0V~12.0V
How to connect the LCD program card:
- Disconnect the battery from the ESC;
- Disconnect the signal cable of the ESC from the receiver; then plug it into the socket marked with ( )
- Connect the battery to the ESC and turn on the ESC.
- Surpass Gecko /Version/Date will be displayed on the LCD screen when ESC is connected, then press any buttons “Ready to connect ESC” will be showed on the LCD Screen., this means that connection between LCD and ESC is established.
If the data connection between LCD and ESC is failed, the LCD Screen is always showing (Ready to connect ESC); Please check if signal wire is connected correctly; if not repeat step1-3.
- If the connection is established successfully, the first programmable item will be displayed on LCD screen. It’s ready to set the parameters now.
Note1: Please strictly connect according to the above sequence. The sequence of step 2 and step 3 can not be reversed. Otherwise, the LCD program card can not work properly.
Note2: A separate power is needed if the ESC is without BEC.
Connect an additional power (5-12V) to the socket marked with ( ) on the left of the LCD program card for power supply. Please be sure that the polarity is connected correctly.
Plug the signal wire into the socket marked with( )first. Then connect an additional power (5-12V) to the socket marked with ( ). Then switch on the ESC. If the sequence is wrong, LCD will not work properly.
Note3: The power supply should be lower than 12V, or the program card will be damaged.
Operation:
*Working as an individual device to program the ESC, the function of the buttons are as follows:
“Menu”: Change the programmable items circularly;
“Value”: Change the parameters of each programmable item circularly
Note: Keeping the “Menu” or “Value” button holding can select the desired parameters quickly.
“Reset”: Return to the default settings
“OK”: Save the current parameters into the ESC. If you don’t press “OK” button, the customized settings will not be saved and updated into the ESC. If you just press “Menu” button, the customized settings are just saved into the program card, not into the ESC.
E.g.: Firstly, enter the interface of a customized programmable item (e.g.: cut-off voltage 3.2/cell); Secondly, press “Value” button to select the parameters; At last, press “ok” button to save the parameters in the ESC.
*Working as an USB adapter to link the ESC with a PC to update the firmware of ESC and set the parameters on PC.
Free Shipping & Return
Free shipping on all orders over Rs. 2000
Money back guarantee
100% original products
Online support
11pm to 8pm
- Latest Products


-
-
-
-
-
 Special Price PKR6,315.00 Regular Price PKR8,015.00Out of stock
 -
-
ROCKET 120A Competition ESC with TURBO function for 1/10 RC Car
Special Price PKR9,815.00 Regular Price PKR12,959.00Out of stock